|
Build the Ultimate
PC Gaming Machine

Building the ultimate PC gaming machine is
not as difficult as some may think and unlike systems from 20 years ago,
manufactures of PC components have definitely improved how they all
connect together. No more grazed knuckles or chain-swearing and best of
all, if you stick to well-branded items, the installation process should
take no more than an hour or so. Sometimes there's also an element of
cost saving involved as opposed to purchasing an outright gaming machine
and all you need to build your own machine is a decent Phillips head
screwdriver, plenty of space and good lighting.
Components
Before you start building your Ultimate PC Gaming Machine, you first
need to do some research as to what is in your price range and generally
with PC parts, branded items are generally far superior than no-brand
products. However they can also be more expensive. The components needed for your PC
include a case, motherboard, CPU, memory, power supply, graphics card,
hard drive and optical drive. However the problem with building your own
PC-rig is that if you skimp in one area (e.g. motherboard or hard
drive), this does have an affect on the overall performance of your
machine. In order to get that ultimate PC Gaming Machine, you may need
to budget a little more which will result in better PC performance and
allow you to run games such as Crysis 2, Battlefield 3 and Batman Arkham
City on FULL HD with full detail.
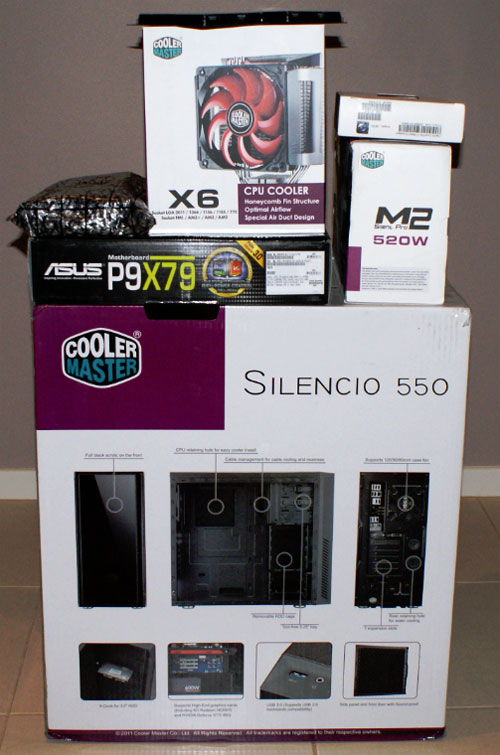
For Impulse Gamer's Ultimate PC Gaming Machine, we used the following
items;
-
Intel
Core i7-3960X Processor ($1044)
-
Kingston KHX 1600C9D3K4/16GX Memory (16GB) ($115)
-
ASUS
P9X79 Motherboard ($269)
-
Cooler Master M2 520W Silent Pro Power Supply ($150)
-
Cooler Master Silencio 550 ($95)
-
Cooler Master X6 CPU Fan ($75)
-
Kingston 240GB SSDNow 200 Hard Drive ($360)
-
Seagate Barracuda 1TB (600 MBps - 7200 rpm) ($95)
-
LG
CH12LS28 12X BD-R Blu-ray DVD Combo Drive ($59)
-
ASUS HD 7970 DirectCU II Top ($599)
-
Windows 7 64 ultimate ($175 EOM)
-
Logitech G510 Keyboard
Total
Cost = $2831AUD (May 2012)
Component Highlights
CPU: Intel Core i7-3960X
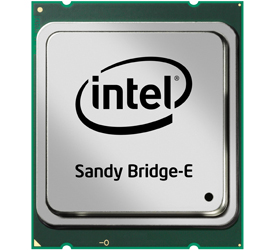
Built
on the Sandy Bridge-E architecture, the Intel Core i7-3960X is one of
the most powerful CPU's available to the home market that runs at a
whopping 3.3Ghz with a maximum turbo frequency of 3.9Ghz. This 64-bit
processor has 6 cores, 12 threads, 15MB of Intel Smart Cache and a TDP
of 130W. With the addition of the Turbo Boost feature, this greatly
improves programs like Adobe Photoshop, iTunes and of course gaming.

The
processor supports three different memory types that include DDR3-1066,
1333 and 1600. In our professional opinion, a powerful CPU is a must
have component of a true gaming machine, followed closely by the
Graphics Card and the Memory. With that said, the Intel Core i7-3960X
CPU is definitely the crown of Ultimate PC Gaming Machine. [Full
Review Here]
Features
-
Number of Cores - 6
-
Number of Threads - 12
-
Clock Speed - 3.3 GHz
-
Max Turbo Frequency - 3.9 GHz
-
Intel® Smart Cache - 15 MB
-
Bus/Core Ratio - 57
-
DMI - 5 GT/s
-
Instruction Set - 64-bit
-
Instruction Set Extensions - SSE4.2, AVX
-
Embedded Options Available - No
-
Lithography - 32nm
-
Max TDP - 130 W
-
VID Voltage Range - 0.6V-1.35V
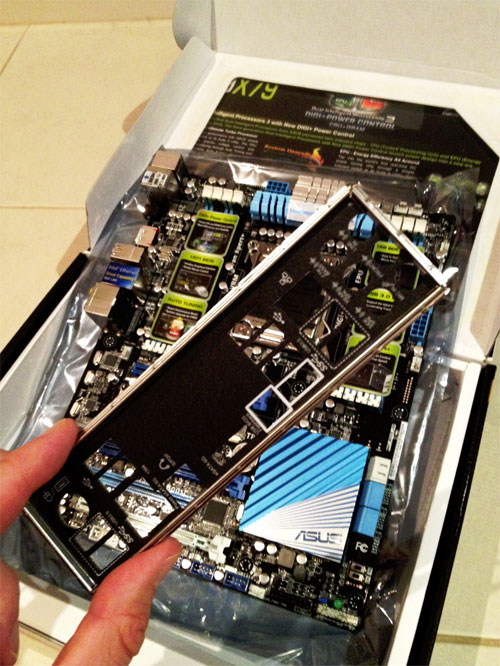
Motherboard: Asus P9X79
Choosing a motherboard is a complicated task and each of the boards have
their pros and cons. For our system, we were tossing up between the ASUS
P9X79 and the ASUS P9X79 Pro. Eventually the ASUS P9X79 won out as the
differences between the Pro model and standard were quite minimal with
the highlights of this motherboard being the Dual Intelligent Processors
3 with DIGI+ Power Control.
In
turn, this
promises the user faster sensing and response, better cooling and
improved load tolerances. The Turbo Process Unit via the onboard switch
or AI Suite II Utility gives you precise voltage control and advanced
monitoring of your system, ensuring better over clocking and management
of your system. Add in USB 3.0 integration, support for next generation SATA 6Gb/s drives, DTS 5.1 Surround Sound and support for i7 core
processors (our Queen component for the i7-3960X) and our Ultimate PC
Gaming Machine was starting to take shape.
Features
-
Dual
Intelligent Processors 3 with New DIGI+ Power Control
-
Support for up to 64GB of system memory with an 8-DIMM design
-
UEFI BIOS - Full-scale performance tuning with easy BIOS Interface
-
Quad-GPU SLI and Quad-GPU CrossFireX Support!
-
Power eSATA 6Gb/s Ready - 2X faster with fully charged power
-
Intel® LAN Support - Faster Transfer Speed
-
USB BIOS Flashback - Easy, worry-free USB BIOS Flashback
Graphics Card: ASUS HD 7970 DirectCU II Top
As the
words indicate, a graphics card is what displays the graphics on your PC
and this can mean the difference between flawless gameplay or jitter.
For this test, we chose the ASUS HD 7970 DirectCU II Top that uses the revolutionary
28nm GCN architecture. Add in a 925Mhz engine clock, 3GB of GDDR5 Memory
plus PCI express 3.0 and this card has the ability to move
massive graphical designs around in nanoseconds. The ASUS HD 7970
DirectCU II Top is a true beast when it comes to gaming and best of all,
it's quiet. [Full review here]
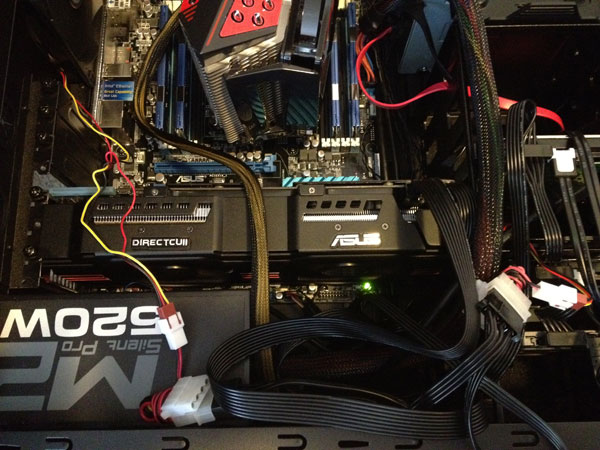
The ASUS HD 7970 DirectCU II Top... home
sweet home!
Features
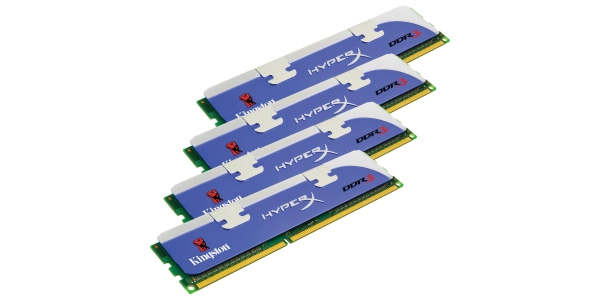
Memory: Kingston KHX
1600C9D3K4/16GX Memory (16GB)
This
four module kit would prove to be the brains of our gaming machine.
Boasting 16GB of 1600Mhz DDR Non-ECC CL9 DIMMS, it offers our PC high
performance memory that is perfect for gaming. The HyperX range
of memory not only targets the PC enthusiast but it also compatible with
the Core i3 processors and has been designed to keep your RAM cool
thanks to its heat spreaders.
Features
-
JEDEC standard 1.5V (1.425V ~ 1.575V) Power Supply
-
VDDQ = 1.5V (1.425V ~ 1.575V)
-
667MHz fCK for 1333Mb/sec/pin
-
8
independent internal bank
-
Programmable CAS Latency: 9, 8, 7, 6
-
Posted CAS
-
Programmable Additive Latency: 0, CL - 2, or CL - 1 clock
-
Programmable CAS Write Latency(CWL) = 7 (DDR3-1333)
-
8-bit pre-fetch
-
Burst Length: 8 (Interleave without any limit, sequential with
starting address 000 only), 4 with tCCD = 4 which does not
allow seamless read or write [either on the fly using A12 or
MRS]
-
Bi-directional Differential Data Strobe
-
Internal(self) calibration : Internal self calibration through ZQ
pin (RZQ : 240 ohm ± 1%)
-
On
Die Termination using ODT pin
-
Average Refresh Period 7.8us at lower than TCASE 85°C, 3.9us at 85°C
< TCASE < 95°C
-
Asynchronous Reset
-
PCB : Height 1.180 (30.00mm), double sided component
Powersupply: Cooler Master M2
520W Silent Pro Power Supply
Although not the 1000W model, the 520W was more than adequate to power
our gaming machine and more importantly, was extremely quiet in use.
With around 100,000 hours of use plus a five year warranty, the Cooler
Master M2 520W comes with a variety of features perfectly suited for
gaming that include a copper-aluminium heat sink which removes heat
quickly, silent operation thanks to the 135mm hydraulic fan, modularized
cabling to assist with installation and greater airflow, Intel
compliance and a great eco-friend design to minimise power consumption.
As the giant heat sink absorbed all the heat from the CPU, the
motherboard believed that the fan was not working due to its low RPM's.
[Full review here]
Features
Case: Cooler Master Silencio 550
Gaming
Machines can be noisy due to fans, power supplies and cases, however this would not be the case with the
Cooler Master Silencio 550. Thanks to the sound proofing panels on this
case, it not only keeps the noise in but it boasts one of the best
airflow designs available that takes cool air in and pushes warm air
out. It has two 800rpmm silent fans to assist in the heat dispersion
plus great manoeuvrability inside and USB 3.0 support. This would be the
body of our Ultimate PC Gaming Machine. [Full
Review Here]
Features
-
Includes two 800rpm silent fans at front and rear (supports up to
three 120mm fans)
-
Top I/O panel for easy access
-
High quality foot stands
-
Side panels with sound-proof foams for extreme silence
-
Easily maintain dust filter with quick access
-
Stylish and simple design with sleek lines and mirror finish front
panel
CPU
Cooler: Cooler Master X6 CPU Fan
Measuring at a whopping 157.3 x 113.8 x 163.3 mm, the X6 is easily one
of the largest CPU coolers that I've had the pleasure of using. Due to
the unique honeycomb fin structure, this assists in keeping your CPU as
cool as possible, even under stressful situations. Combing with the heat
dissipation technologies of the Cooler Master Silencio 550 case, you can
rest assured that the CPU cooler will ensure the best possible air flow
around your CPU and if the loads should increase, the fan can increase
in speed from 600 to 1900 RPM's. Installation is not your average CPU
cooler but it's definitely worth it... even the frustration that we
experienced. [Full
review here]
Features
-
Unique honeycomb fin structure achieves maximum surface area
coverage and cooling performance.
-
Heat sink base and fins angled for better cold air intake from
chassis fans creating optimal air flow and heat dissipation.
-
Ease installation with a quick-snap fan bracket design.
-
Extra air flow provided by a special air duct.
-
Wide range PWM fan (600 1900 R.P.M.) providing versatile
performance while idle and at full load.
Hard Drive (Main): Kingston
240GB SSDNow 200
Our
main hard drive was the Kingston 240GB SSDNow 200 that is the hard drive
of the future with unparalleled read/write speeds. Supporting a high
speed SATA 3.0 (6Gb/s) SandForce SF-2281 Processor, this creates
sequential read and write speeds of up to 535MB/s and 480MB/s. For
gaming, this means super fast load times and more importantly, silky
smooth graphics. [Full review
here]
Features
-
Flash technology makes the drive respond faster to commands
-
Shock-Proof
-
Runs silent and with no moving mechanical parts
-
Generates much less heat than traditional hard drives, ideal for
notebook users
-
Consumes less energy than a traditional hard drive
-
Ensures maximum performance on compatible operating systems
Supports S.M.A.R.T.
Keyboard: Logitech G510
In
order to get the gaming edge, a gaming keyboard is a must and the
Logitech G510 is the answer. With a response rate of four times faster
than other gaming keyboards, this is the edge you need when your playing
first person shooters or online games. Add in some cool features like
custom colour backlighting, programmable keys and this the main input
you need for not only playing games but using your PC. [Full
review here]
Features
Installation
The first thing you need to do before building your gaming machine is to
ensure you have a clean workspace, all your parts ready and a Phillips
head screwdriver. It is advisable that you build in a room that
minimises static electricity so carpets are generally out. If you are
unable to avoid a carpeted area, anti-static gloves are available and
rather than sprawling all your components on the floor or bench, keep
the components in their anti-ESD bags.
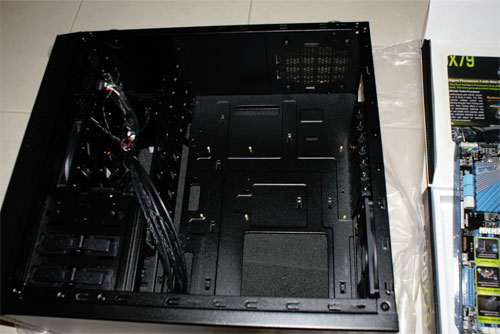
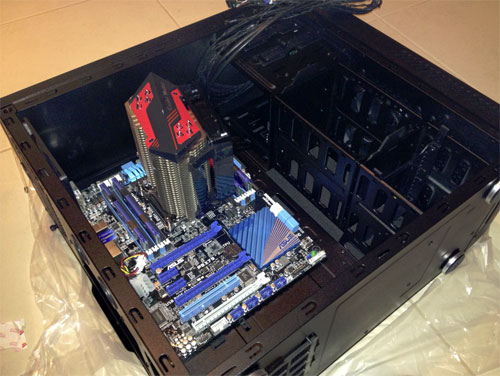
The Silencio 550 provides ample room and
clearly labelled parts (including instructions) to get your new PC ready
The
first step was to open up the Silencio 550 case in order to get the
motherboard ready to be fitted and install the screw holders onto the
case for the motherboard to sit on. Once these have been installed, you
then need to install the back face plate which can sometimes be forgotten in
all the excitement. We've both failed to install this piece on occasion
which can be quite frustrating. Following this, you neatly sit the
motherboard onto the holder screws and then fasten the screws onto the
main board to hold it in place.
The back faceplate of the motherboard
should be installed before you place the main board inside the case
Fastening the motherboard onto the case
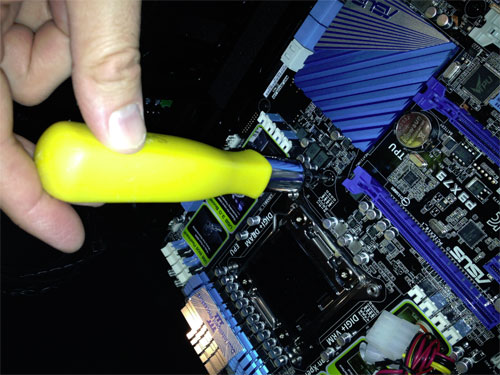
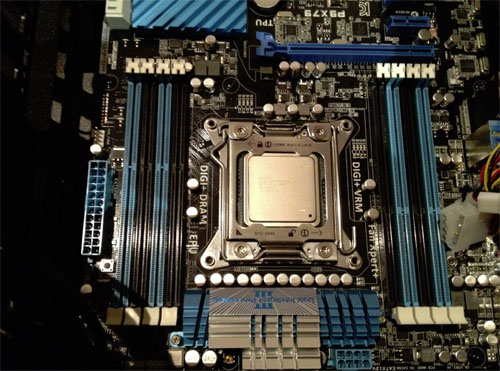
The
CPU is the next step and on the ASUS P8P67 motherboard, you need to
unhook the CPU holder. Once unhooked, you can then place the CPU onto the
motherboard and thankfully everything is labelled so your CPU only fits
one way. Once the CPU has been installed, you close the brackets and
your CPU will be in place. Next up was our Kingston Memory. You need to
unclip the memory clips on the main board in order to install the memory
into these slots.
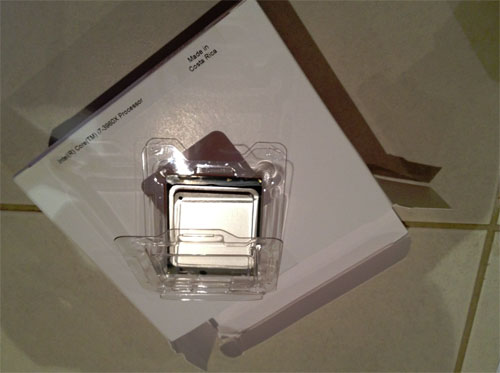
The soul and heart of any mega PC, the
Intel Core i7-3960X CPU
Opening the CPU holder can be tricky but
once the clip is back, you can then install your CPU
The CPU holder on the motherboard keeps
the Intel Core i7-3960X firmly in place
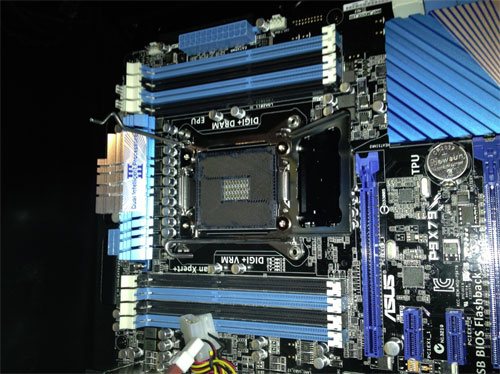
Depending on your motherboard, memory must be placed in certain sockets
in order to get the most from your memory. On our ASUS board, the blue
Kingston RAM fitted into the four blue sockets on the motherboard. How
easy is that? The
memory can only be fitted one way so you need to be aware of the groove
on the memory sockets on the motherboard that in turn aligns with the
memory grooves. By ensuring that both are lined up, it will prevent you from
forcing the memory in the wrong way and potentially damaging either them motherboard,
RAM or both.
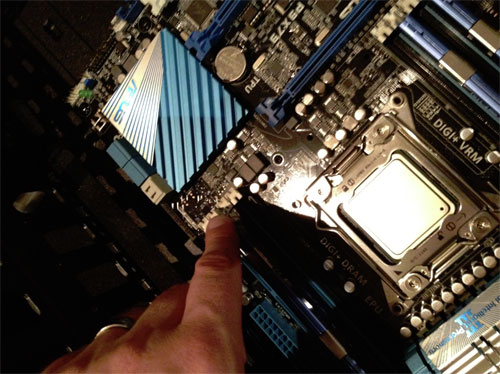
Once the memory is aligned, you can then
push them into the memory slots.
Once
it is lined up, you first push one side of the memory down and then the
other. The clips that were once opened will now be closed, ensuring that
your memory is securely fastened. This step needs to be repeated for all
memory modules. We also chose to install the case cables (e.g. HDD LED,
Power LED) next as when the graphics card is installed, the room
to manoeuvre has been minimised greatly. This also included our front
ports (e.g. USB 3.0, SD), audio (headphone, microphone) and power lights
(HDD, power) plus reset and the on/off button.
Next
up is the CPU cooler, the X6. This was probably the most difficult
aspect of the installation as there was one step missing from the
instruction manual that made the installation a little challenging. By
removing the fan from the X6, this assisted greatly in lining up the
huge cooler and then fastening it to the motherboard. After some Google
searching and YouTube videos to no avail, we decided to remove the fan
that was attached to the heatsink and voila, everything fell into place.
Following this, we installed the Cooler Master power supply which first
needed to be screwed securely onto the case before installing the power
cables. Once we screwed the power supply into the case, we were ready to
connect the power to the motherboard.
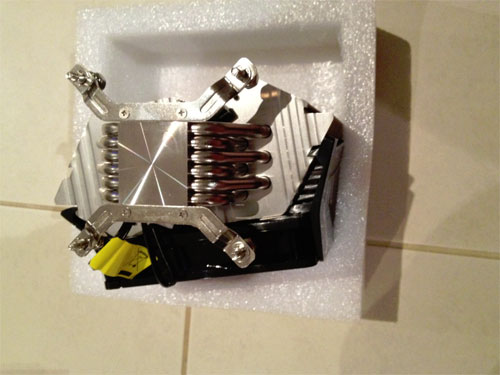
The base of the X6 CPU Cooler
Success! The Coolermaster X6 CPU Cooler
is installed
Following the power supply installation, we commenced the installation
of our hard drives. We used the Kingston 240GB SSDNow 200 as our primary
hard drive which would host our operating system (Windows 7) and other
important programs. SSD drives are super quick and by installing the
operating system onto this drive, it would ensure a very fast boot-up
speed. Originally the PC booted up in around 30 seconds, however after
we installed out programs and some test utilities, the boot-up speed
went up to around 35 seconds. This is still quite impressive. Games on the other hand could be stored on the Seagate Barracuda
1TB (600 MBps - 7200 rpm) that although not as fast as the SSD would
still provide adequate loading times.
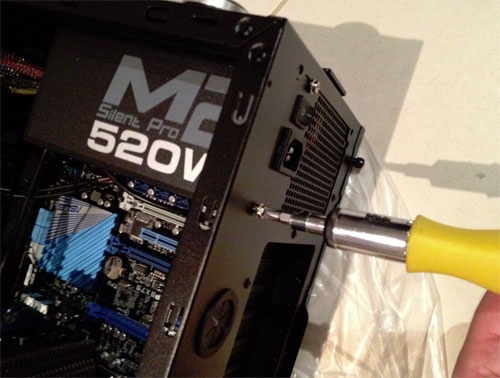
Installing the M2 Silent Pro 520W - once
again, the only tool needed in construction is the Phillips Head
Screwdriver
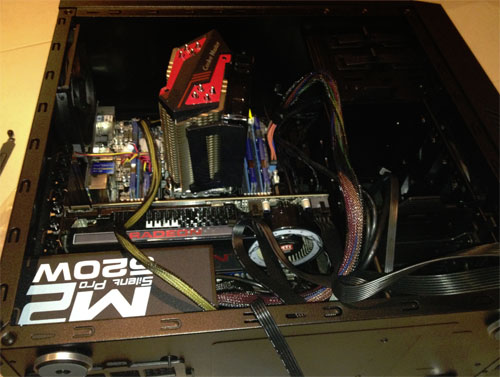
Connecting the power cables
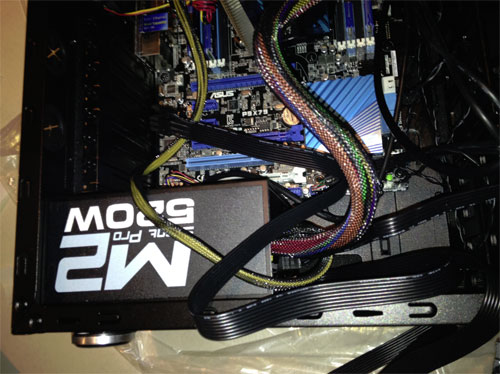
Although this looks quite messy,
Coolermaster have included some cable ties which neatly put everything
into place.
Next
was our Blu-ray player that neatly slotted into the CD bay. The
Silencio 550 case had a quick lock function which put the drive in place
which assisted us screw the drive to the case. Once the hard drives and
Blu-ray was installed, we were ready to connect the power cables and
SATA cables to these components. The last piece of the puzzle was the
graphics card. In order to install the graphics, you need to remove the
two back faceplates which prevent dust from coming into the case and
then install the card into a
spare PCI slot. Once done, we screwed the graphics card into the case to
ensure that it is secure. The last part of the graphics card puzzle was
to connect the PCI-E power adapters.
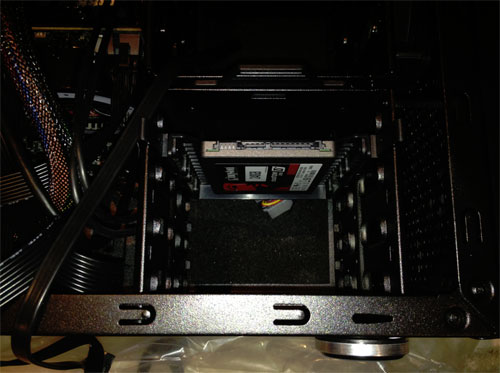
Installing the Kingston 250GB SSDNow
Drive
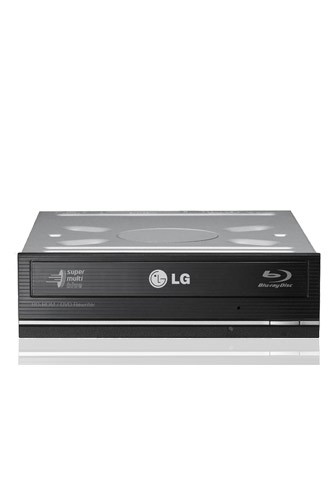
Our trusty LG Blu-ray player
Final Elements & Software
Before
installing your FULL HD monitor, keyboard, mouse and speakers, you
should test whether your computer works and by plugging in the power
cable, and pushing the "on" button on the computer, everything should
start up. You should hear a "beep" if your speakers are correctly
plugged in. When we turned out PC on, everything began spinning up from our
X6 Cooler Master Fan to our graphics card and the hard drives. With the
King (Intel Core i7-3960X Processor) and Queen (ASUS HD 7970 DirectCU II
Top)
securely in place, followed by their knights (RAM) and other loyal chess
pieces, we were ready to install our brain (Windows 7 64 Ultimate).
In
order to install Windows 7, we needed to tell the BIOS to boot from the
Blu-ray player. Once we changed this setting in the BIOS, the system
proceeded to boot-up. When the Windows 7 disc booted up, there was
minimal input from the user and it even detected our wired network
connection. Once windows was installed, we were ready to test our new
gaming machine. We did test our Ultimate PC Gaming Machine with Windows
8, however we found the BETA quite lacking which forced us back to
Windows 7.
Tweaking
We did
need to do some tweaking with our Ultimate PC Gaming Machine. Firstly,
when our PC was turned on, the BIOS would report a fan error. The reason
being is that the X6 has a giant and we do mean GIANT heatsink on it. In
turn, this forces the fan to run at a considerably lower speed than most
fans which the BIOS believed this to be an error. In order to fix this,
we basically needed to adjust the Fan Speed limit to the lowest possible
setting. This fixed this problem perfectly. Secondly, in order to over
clock our PC (yes it could still go faster), we needed to install the
motherboard and graphic utilities which allowed us to tweak the speed of
the system even further. Fortunately due to all the high quality
products used in the assembly of this machine, this allowed us to get at
least an additional 33% in some instances.
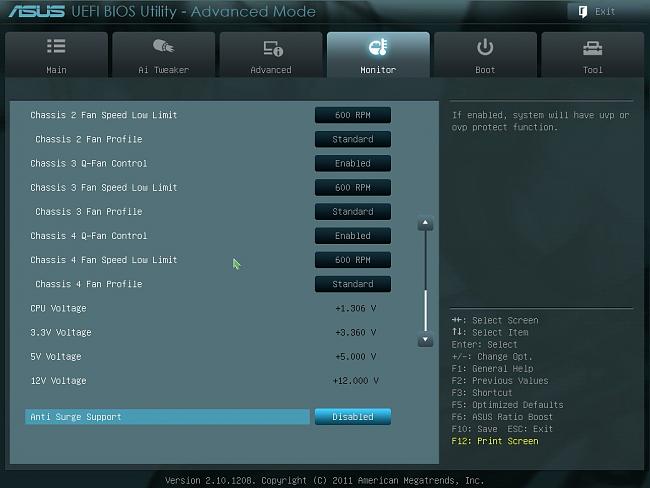
ASUS
P9X79 Motherboard BIOS Menu System
Benchmarking
We
tested a variety of programs and games on our Ultimate PC Gaming Machine
and we were quite impressed with the results. It's easily one of the
fastest PC's that we've had the pleasure of using. In the next week
(30th of April), Impulse Gamer will be posting our results for the
Windows Experience, 3DMark11, Battlefield, World of Warcraft and more!
(#: benchmarking is a challenging science as components, software and a
mixture of all can effect scores)
Cinebench Benchmark (Multicore)
Cinebench helps test the processor in
real-world tests, especially when it comes to graphics and the company
behind Cinebench, MAXON has helped created some of world's most
amazing special effects thanks to their software. Movies like Spider-man
could not have been possible without the power of their software
packages. Although the CPU was knocked off the perch from the Xeon CPU,
it did come second in the test at 10.38 points.
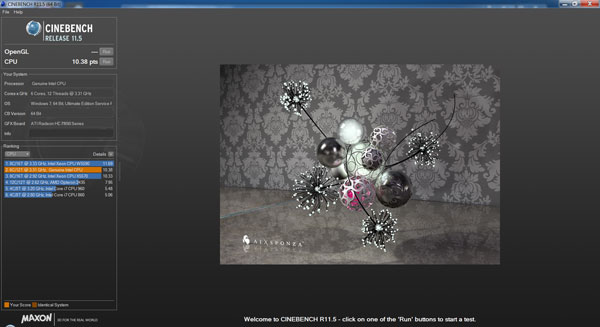
 10.38 (INTEL i7-3960X)
 7.45 (INTEL i7-2600)
 5.45 (AMD FX-8150)
Gaming was another place where the Intel
i7-3960X excelled and although the differences between the i7-2600 were
only a slight improvement, the processor was still number one. The
reason being is that as this architecture is quite new, until programs
such as the latest DirectX and gaming companies support, it may still
take another 6 or so months to see greater differences. Even so, the
framerates for all the games below were silky smooth with no lag or
tearing whatsoever.
Battlefield 3
(1920x1080 - High)
75 FPS (INTEL i7-3960X)
70 FPS (INTEL i7-2600)
68 FPS (AMD FX-8150)

Batman Arkham City
(1920x1080 - High)
81 FPS (INTEL i7-3960X)
80 FPS (INTEL i7-2600)
75 FPS (AMD FX-8150)

World of Warcraft
(1920x1080 - High)
120 FPS (INTEL i7-3960X)
111 FPS (INTEL i7-2600)
72 FPS (AMD FX-8150)

DiRT 3
(1920x1080 - High)
72 FPS (INTEL i7-3960X)
71 FPS (INTEL i7-2600)
69 FPS (AMD FX-8150)

Final Thoughts?
By
aiming high in building a gaming rig, you do future proof your PC for a
couple of years and best of all, the components included in this build
can easily be upgraded. By using a case like the Cooler Master Silencio
550, this makes upgrading a breeze due to the amount manoeuvrability
inside the case itself.
As this
current system ran games like Battlefield 3, Crysis 2, Batman Arkham
City with full detail with no chugging at all, you are fairly safe that
the next few years will pose no issues to true hardcore gaming.
When you
do notice that games are starting to cause a few issues, the upgrade
path of this system would be to replace the graphics card which in turn
would give you another few years of powerful gaming. All in all, this
was an exciting exercise at Impulse Gamer that we had a ball making and
testing the end product.
So what
are you waiting for? Creating your ultimate PC gaming machine is not as
difficult as you think! |